Shortly after kicking off development in anger, it became apparent that the SPI programming interface wasn't quite working as I had hoped, it would drop out or fail randomly and in some cases, I had to power cycle the Arduino to get the system talking properly.
After a bit of debugging with the scope, I determined that the SPI programming interface signals were quite noisy, since they come from the Pi, through the interface board, over a jumper cable, onto the main board and across to the Pi.
I tried all manner of fixes and read up extensively on this, I settled for a new connector placed closer to the Arduino that had better, thicker wires and an LC filter on each of the pins at the Arduino end of the cable, things were looking much better. I also tried different SPI speeds to try and optimise the programming speed. During this testing, things went from bad to worse, I suddenly lost the ability to talk to the Arduino again, no problem, I thought, i'll power cycle it and do it again.
This time however, AVRDUDE could not talk to the device since its fuse values said it was protected. This was odd as I hadn't asked it to do that. No problem, I'll just erase it and start again. Nope, it's protected, you can't erase it using AVRDUDE.
I read up on line about this and find that others have had similar problems, you just need to use high voltage erase mode to sort things out, this Is the mode that is used to perform the initial programming when the chip has first been manufactured and in an unknown state. The problem is that this is a parallel programming mode and this is not supported by AVRDUDE. The process is detailed in the data sheer along with the pinout.
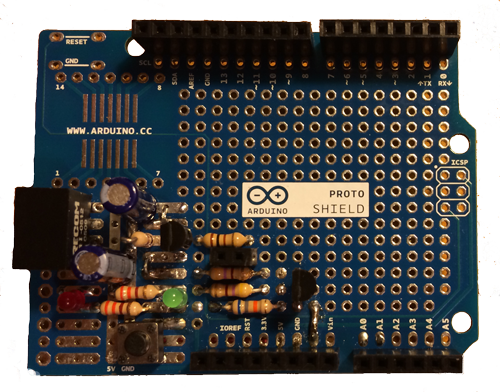
After a bit more research. I find that MighyOhm have produced a Sketch for the Arduno that allows you to recover devices using HV mode, you just have to make up a programming interface and off you go. So I knock up the required board using a spare prototyping board and program the Arduino with the app. right, so, lets just hook this up and get back to what we are doing.

I start connecting up the board in the required manner, but soon find that I can't locate some of the pins I need, so I check the data sheet, yes, they are there, so, off to the Arduino reference board design to see where they go. I soon find a missing pin on a component, but I also find that some are not even taken off the chip. - great.
As the Arduino Mega is about boards are £40 a piece, I don't want to loose a board like this, particularly when I don't know why it broke in the first place.
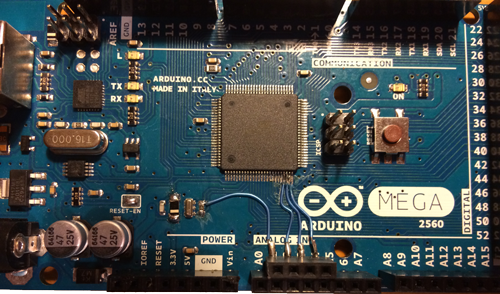
So, it's time to improvise. Out comes the 30swg wire, which is the thinnest I have and we're going to have to solder to those legs on the device. To make life more interesting, this means 3 adjacent connections to pins, so there is zero room to space. Even with a good magnifier and a steady hand, it was very difficult to make these connections without shorting one pin to another. At the other end, I connect the pins to a new header that is glued to the standard one. Yes, I know its ugly and no, they really aren't shorting, its close, but they aren't.

Once I'm done, I reconnect the HV recovery shield and start the recovery process, this just asks me for the fuse values, which I don't have. OK, back into the Arduino IDE config files and I find the required values and enter them., we then spend a bit of time debugging the wiring and fixing a couple of errors, then bingo, device erased and available for re-use, except that the erase also took out the Arduino boot loader during the erase process, since it does everything.
Next, we have to put the boot loader back. Like anything you've not done before, understanding the process is half of the battle. I get another Arduino Uno, upload the ArduinoISP sketch to it, connect it up per the wiring details in the top of the sketch after struggling to find this information, find out that you have to change the board to the target device, then "Burn Bootloader" and you are back in business. Afterwards I find out that there is a help page about this process in the standard framework.
Over the coming days, I got to know this process fairly well and I was glad that I took the time to do the above, otherwise I'd have had a big pile of dead Arduino's and a sizeable dent in the bank balance.
Eventually, I decide that I can't make SPI programming work reliably in the current design and I don't want to have to disassemble the whole unit once its built to recover the board, so I decide to wait until the proper PCB's can be produced before re-visiting this. In the interim, I end up using Serial Programming.

